
How to Enable Guided Access and Screen Pinning for HanderAya
Picture this: you're sitting in the paddock, headphones on, starting to visualize the track — and a Messenger notification pops up. Concentration gone. You start all over again.
Guided Access (iOS) and Screen Pinning (Android) solve this problem. They lock your phone to a single app — in this case HanderAya — and eliminate everything that could distract you: notifications, accidental gestures, app switching. Below you'll find step-by-step instructions for both platforms — you'll set up the lock in 2 minutes and pair it with a mental session before heading out on track.
Table of contents
- What is single-app lock and why you need it at the track
- How to enable Guided Access on iPhone (iOS)
- Step 1 – Turn on the feature in Settings
- Step 2 – Open HanderAya and start the lock
- Step 3 – End the session after practice
- How to enable Screen Pinning on Android
- Step 1 – Turn on the feature in Settings
- Step 2 – Pin HanderAya
- Step 3 – Unpin after your session
- iOS vs Android — comparison
- Troubleshooting
- FAQ
- What's next
- See also
What is single-app lock and why you need it at the track
Both iOS and Android have a built-in feature that locks your phone to the currently open app. On iOS it's Guided Access — available since iOS 6 on every iPhone. On Android it's Screen Pinning (also called App Pinning) — available since Android 5.0 Lollipop, meaning virtually every smartphone from the last decade.
In both cases the result is the same: once activated, you can't leave the app without entering a code. You won't see notifications, you won't switch to Instagram, you won't answer a call (unless you choose to).
Why use this with HanderAya
- Zero distractions — a track visualization session demands continuous focus. A single notification resets your progress.
- Screen stays on — combined with auto-lock settings (iOS) or Wake Lock (Android), the screen stays lit throughout your entire breathing session.
- Safe to hand over your phone — if someone in the paddock wants to see what you're doing, hand them the phone with the mode enabled. They won't leave HanderAya.
- PWA works without limitations — HanderAya as a Progressive Web App added to your home screen launches in standalone mode (no browser bar). The lock treats it like any other app.
Requirements
- iPhone running iOS 12 or later (recommended: iOS 18+) or Android phone running 5.0+ (recommended: Android 12+)
- HanderAya installed on your home screen (how to install HanderAya)
- 2 minutes for a one-time setup
How to enable Guided Access on iPhone (iOS)
Setup is one-time — once done, you'll activate the lock with a single gesture every time.
Step 1 – Turn on the feature in Settings
- Open Settings → Accessibility.
- Scroll to the General section and tap Guided Access.
- Toggle Guided Access on.
- Tap Passcode Settings → Set Guided Access Passcode. Enter a 6-digit code — different from your iPhone unlock code.
- Turn on Face ID (or Touch ID) — this lets you end a session with a glance, without entering a code.
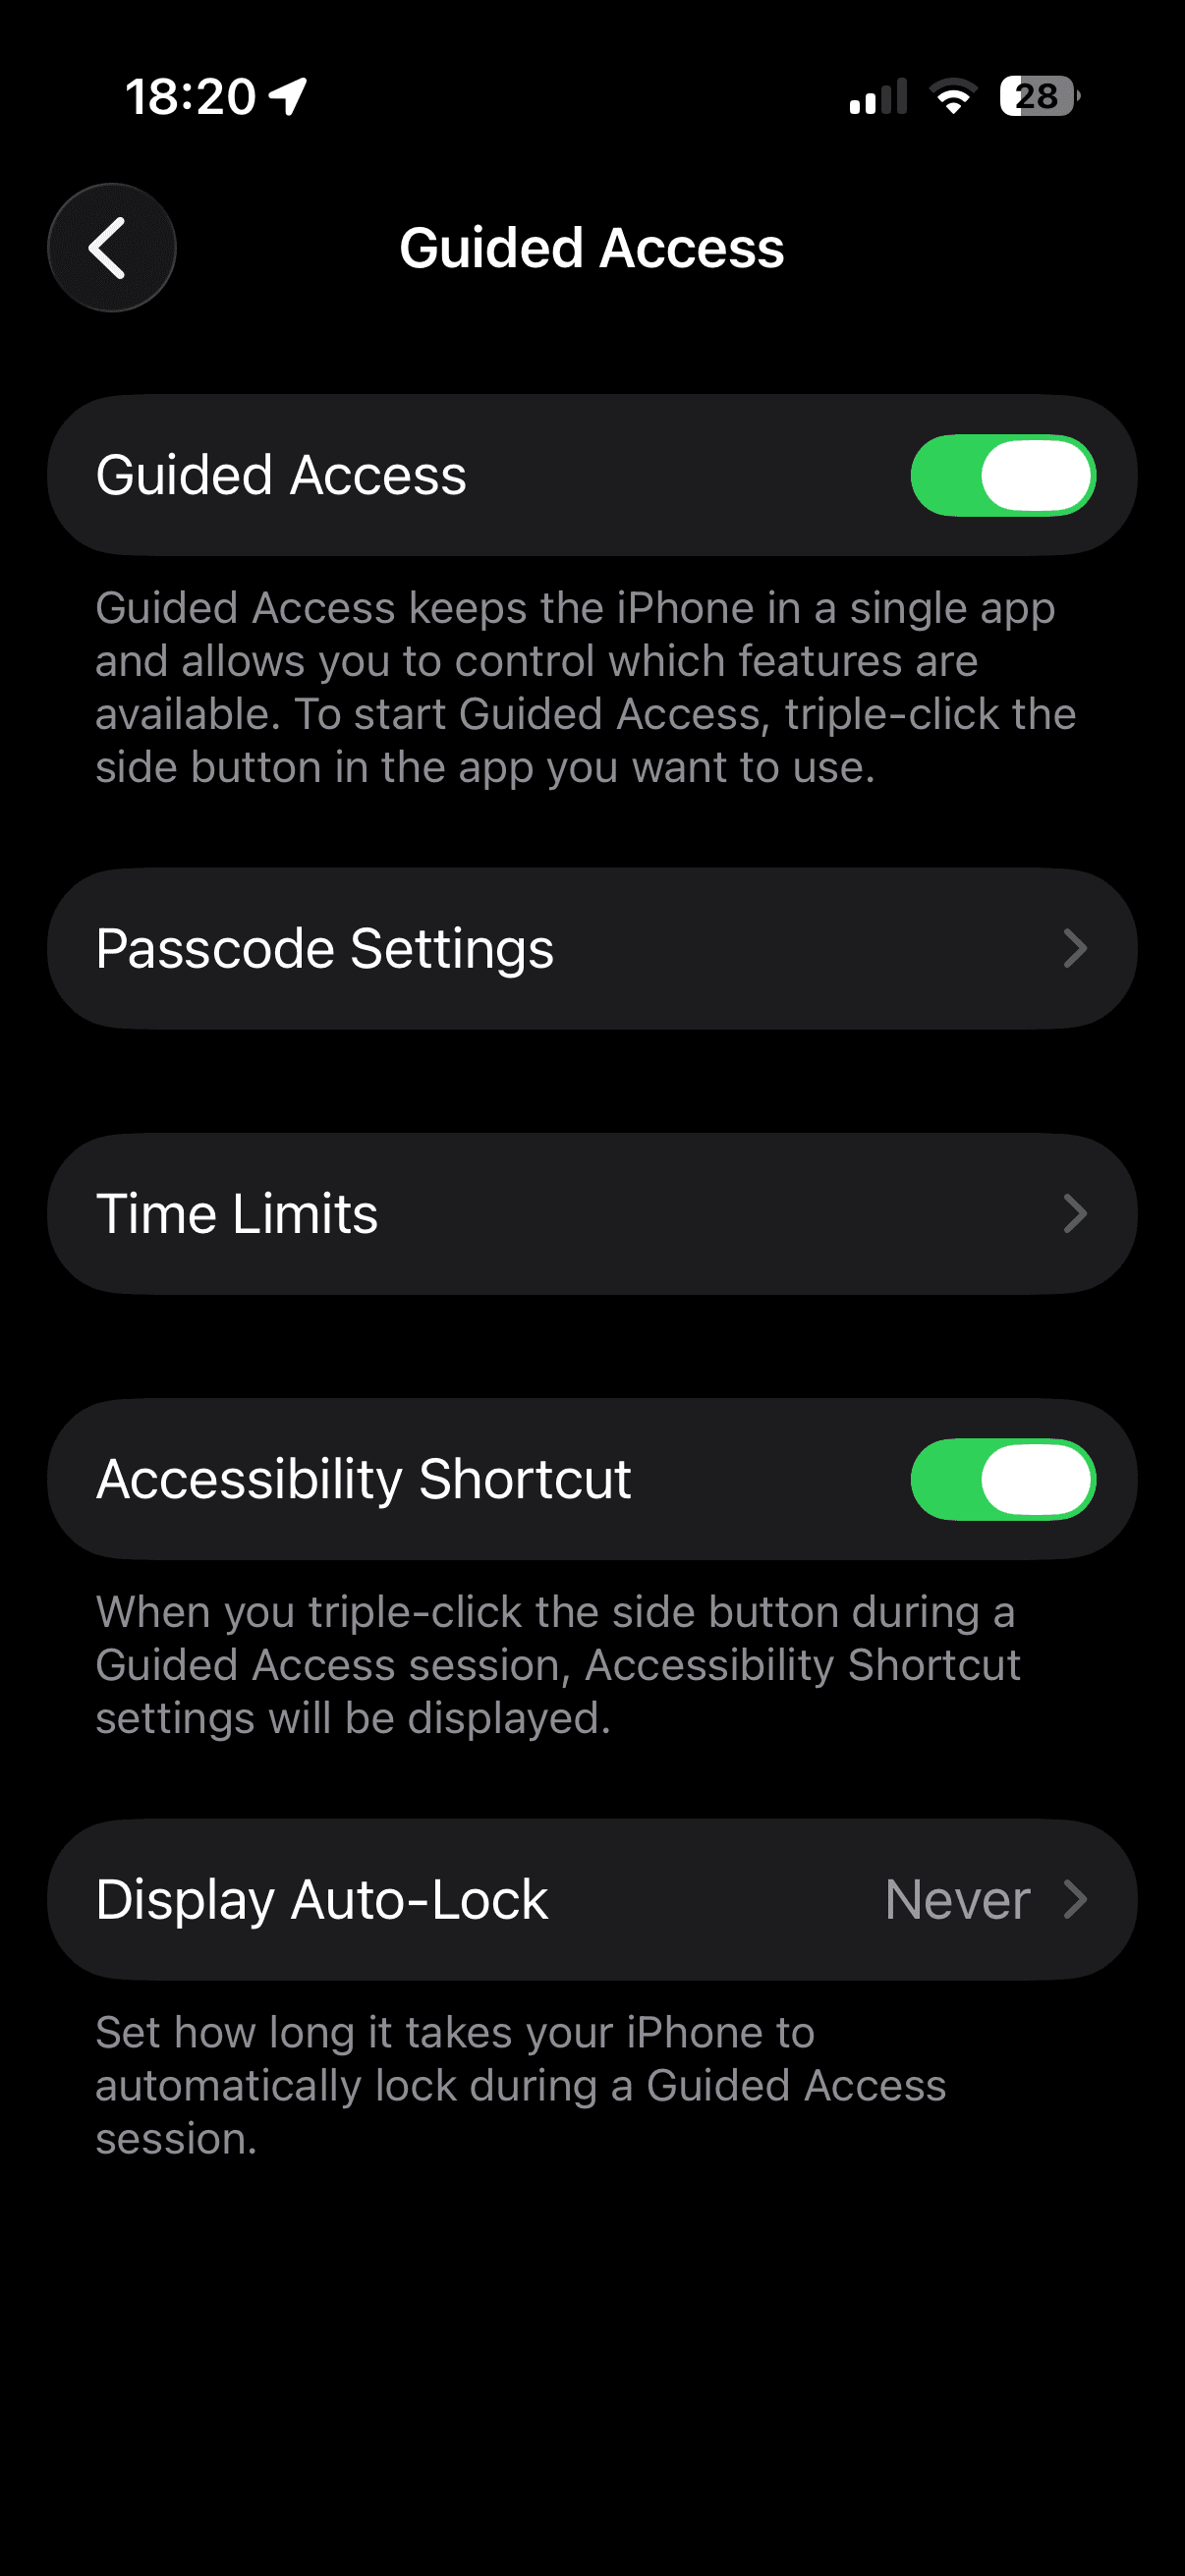
Tip: Tap "Display Auto-Lock" and set it to "Never" — this prevents the screen from turning off during a visualization session.
Step 2 – Open HanderAya and start the lock
- Open HanderAya from your home screen (PWA icon).
- Quickly press the side button 3 times (or 3 times the Home button on older iPhones).
- If the Accessibility Shortcuts panel appears, select Guided Access.
- On the configuration screen, you can optionally circle areas of the screen you want to disable (e.g., if you don't want someone accidentally changing the track).
- Tap Options (bottom left) to disable hardware buttons, touch, or motion — or set a time limit for the session.
- Tap Start (top right).
Done. Your iPhone is now locked to HanderAya. You can start your track visualization session in peace.
Step 3 – End the session after practice
- Press the side button 3 times (iOS 18.1+) or side button 2 times (iOS 18 and earlier).
- Authenticate — Face ID, Touch ID, or your Guided Access passcode.
- Tap End in the top left corner.
Safety at the track
While Guided Access is active, Crash Detection and emergency calls do not work. Always end the session before leaving the paddock for the track.
How to enable Screen Pinning on Android
The process is similar, though option names vary depending on the manufacturer.
Step 1 – Turn on the feature in Settings
Open Settings and find the pinning option. The path depends on your manufacturer and Android version:
| Manufacturer / Version | Path |
|---|---|
| Stock Android 12+ (Pixel) | Settings → Security & privacy → More security settings → App pinning |
| Samsung One UI 6+ | Settings → Security and privacy → Other security settings → Pin windows |
| Samsung One UI 4–5 | Settings → Biometrics and security → Other security settings → Pin windows |
| OnePlus / OxygenOS | Settings → Security → Screen pinning |
| Xiaomi / MIUI | Settings → Passwords & security → Screen pinning |
Tip: If you can't find the option — use the search bar in Settings and type "pinning" or "pin".
- Toggle App pinning on (or Pin windows on Samsung).
- Turn on the option Require PIN before unpinning — without this, anyone can unpin the app with a simple gesture.
Step 2 – Pin HanderAya
- Open HanderAya from your home screen.
- Go to the recent apps screen:
- Gesture navigation: swipe up from the bottom of the screen to the middle and hold.
- 3-button navigation: tap the square button (Overview).
- Tap the app icon at the top of the HanderAya preview (not the preview itself!).
- From the menu, select Pin this app.
Your phone is now locked to HanderAya. The notification shade, home screen, and app switching are all inaccessible.
Step 3 – Unpin after your session
How you unpin depends on your navigation type:
- Gesture navigation: swipe up from the bottom of the screen and hold (a few seconds, with no visual feedback — be patient).
- 3-button navigation: hold Back and Overview at the same time.
After unpinning, the lock screen appears — unlock with your PIN, pattern, or biometrics.
iOS vs Android — comparison
| Feature | iOS (Guided Access) | Android (Screen Pinning) |
|---|---|---|
| Lock to a single app | Yes | Yes |
| Disable touch in specific zones | Yes (circle with finger) | No |
| Disable hardware buttons | Yes | No |
| Session time limit | Yes | No |
| Require code to exit | Yes (separate code / Face ID) | Yes (PIN / pattern / biometrics) |
| Block notifications | Yes | Yes |
| Works with PWA (HanderAya) | Yes | Yes |
| Setup | Settings → Accessibility | Settings → Security (path varies) |
| Activation | Triple-click side button | Recent apps → icon → Pin |
iOS gives you more control (touch zones, buttons, time), but Android does what matters most — locks the phone to a single app, effectively eliminating distractions.
Troubleshooting
iOS: Triple-clicking doesn't launch Guided Access
- Make sure the feature is turned on: Settings → Accessibility → Guided Access → toggle should be green.
- Check Accessibility Shortcut: Settings → Accessibility → Accessibility Shortcut (at the bottom of the list) → make sure Guided Access is checked. Without this, triple-clicking does nothing.
- You must be inside an open app — Guided Access doesn't work from the Settings app or the home screen.
- Try toggling Guided Access off and on, then restarting your iPhone.
iOS: I'm locked in and can't get out
- Force restart: quickly press Volume Up, then Volume Down, then hold the side button until the Apple logo appears. The Guided Access session will end.
- Then go to Settings → Accessibility → Guided Access → Passcode Settings and set a new code.
iOS: Screen turns off during a session
- Check Settings → Accessibility → Guided Access → Display Auto-Lock — set it to Never.
Android: I can't find the pinning option
- Type "pinning" or "pin" in the Settings search bar. Every manufacturer hides this option in a different place.
- On older Samsung (One UI 4–5): look under Biometrics and security → Other security settings.
Android: App unpins too easily
- Make sure you've turned on the option Require PIN before unpinning (or "Ask for PIN before unpinning"). Without this, a simple gesture is enough to unpin the app.
Both platforms: HanderAya doesn't appear as a separate app
- Make sure HanderAya is installed on your home screen — open handeraya.com/app in Safari (iOS) or Chrome (Android), tap "Share" → "Add to Home Screen". The app must be running in standalone mode (no browser bar).
FAQ
Do notifications still come through during a session?
No — in both modes, notifications are blocked. On iOS, the phone won't ring or show a banner. On Android, the notification shade is inaccessible. That's exactly what you need during a track visualization.
Does Guided Access work with web apps (PWA)?
Yes. HanderAya added to your home screen launches in standalone mode — the system treats it like a regular app. Guided Access and Screen Pinning both work with it without any issues.
Can I set the session to end automatically after a set time?
On iOS — yes: in the session options (Options → Time Limit) you can set a duration, after which Guided Access will display a "Time Expired" message. On Android, this option isn't available — you have to unpin manually.
I forgot my Guided Access passcode — what do I do?
Force restart your iPhone: Volume Up → Volume Down → hold the side button until the Apple logo appears. The session will end. Then set a new code in Settings → Accessibility → Guided Access → Passcode Settings.
Is this safe at the track — what if I need to make an emergency call?
On iOS: while Guided Access is active, Crash Detection and emergency calls do not work. End the session before leaving the paddock. On Android: unpinning is quick (gesture + PIN), so you'll regain access to your phone in a few seconds.
What's next
You've set up the lock mode — now it's time for your first mental session. Open HanderAya, pick a track, set the number of laps, and turn on Guided Access (or pin the screen). Close your eyes and let the visualization guide you through every corner.
Open HanderAya and start a session →
See also
- How to install HanderAya on your phone's home screen — if you don't have the PWA icon yet
- Track Day Nerves: A 5-Minute Ritual That Gets You on Track Calmer — how to start a track visualization session
- Box Breathing vs 4-7-8: Which One Works Best Before a Ride?